
Technical Tip
Before you do this, you must have setup scheduled tasks against your plant items (refer to "Plant Update - Schedule").
You can also create single job cards manually if required (refer to "Job Transaction Processing - Job Card").
Once you have created your plant items and their associated tasks, you can batch create job cards based on plant item, customer, contract date, area or priority ranges. For example, you might create all job cards for the next week.
You can also create job cards for all tasks based on a single estimate. For example, say a particular plant item requires regular servicing at 400 hours, 800 hours and 1200 hours. You could setup separate estimates for each of these services which specify the hours, parts and labour required. Using the Create Scheduled Job Cards feature, you could then create all job cards for that plant item based on the estimate for a 400 hour service.
|
|
|
Technical Tip Before you do this, you must have setup scheduled tasks against your plant items (refer to "Plant Update - Schedule"). You can also create single job cards manually if required (refer to "Job Transaction Processing - Job Card"). |
To create scheduled job cards:
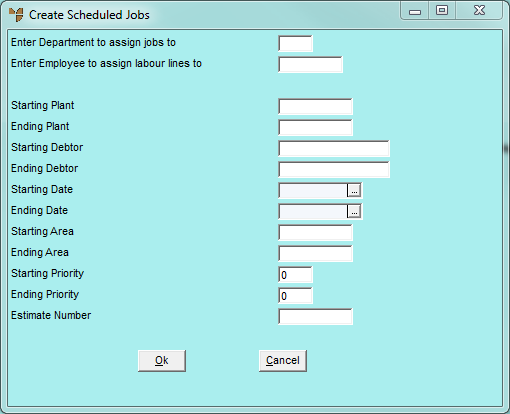
Micronet displays the Create Scheduled Jobs screen.
|
|
Field |
Value |
|
|
Enter Department to assign jobs to |
Enter the ID of the department you want to create job cards for. Press Tab or Enter to select a department. |
|
|
Enter Employee to assign labour lines to |
Enter the ID of the employee you want to assign the labour lines to. Press Tab or Enter to select an employee. You should assign labour to a generic employee at this time. You can change the generic employee to an actual employee in the MPM Job Scheduler (refer to "Plant + Maintenance - Schedule Job Cards"). |
|
|
Starting / Ending Plant |
Enter the starting and ending numbers of the plant items you want to create job cards for. You can also press spacebar then Enter to select plant items. If you enter just the Start or End plant item and leave the other field blank, Micronet will include all plant items from the Start item or up to the End item. |
|
|
Starting / Ending Debtor |
To create job cards for specific debtors, enter the IDs of the starting and ending debtors. You can also press spacebar then Enter to select debtors. Leave these fields blank to include all debtors. If you enter just the Start or End debtor and leave the other field blank, Micronet will include all debtors from the Start debtor or up to the End debtor. |
|
|
Starting / Ending Date |
If you want to include jobs within a specific date range, enter or select the commencement and completion dates. Leave these fields blank to include jobs for any dates. If you enter just the Start or End date and leave the other field blank, Micronet will include all jobs from the Start date or up to the End date. |
|
|
Starting / Ending Area |
To create job cards for specific areas, enter the IDs of the starting and ending areas. You can also press spacebar then Enter to select areas. Leave these fields blank to include all areas. If you enter just the Start or End area and leave the other field blank, Micronet will include all areas from the Start area or up to the End area. |
|
|
Starting / Ending Priority |
To create job cards for jobs with specific priorities, enter the starting and ending priority codes. Leave these fields blank to include jobs with all priority codes. If you enter just the Start or End priority code and leave the other field blank, Micronet will include all priority codes from the Start priority or up to the End priority. |
|
|
Estimate Number |
To create job cards for a specific estimate number, enter the estimate number. You can also press spacebar then Enter to select an estimate. |
Micronet displays the Create Job Cards screen. An asterisk (*) in the first column indicates that a job card will be created when you post or print the batch.

Micronet displays the Process Job Card screen showing the details of the scheduled task.
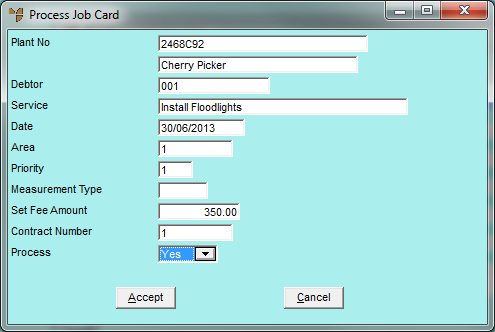
Leave the Process field as Yes if you do want to create a job card.
Micronet redisplays the Create Job Cards screen, with the asterisk removed from the scheduled task if you selected No.
Micronet updates the Scheduled Service Dates screen with the Job Number and changes the Status to Job Card Created (refer to "Plant Scheduled Task - Dates").